The scratch of a pen on paper, a few simple lines, and an empty page start to come alive.
That's the appeal of zentangle patterns. These are structured, repetitive designs drawn one deliberate stroke at a time. In Zentangle, a single pattern is called a tangle.
In 2003, this method was developed by Rick Roberts and Maria Thomas, built on a simple idea: almost anyone can create beautiful art when the process breaks down into small, manageable marks.
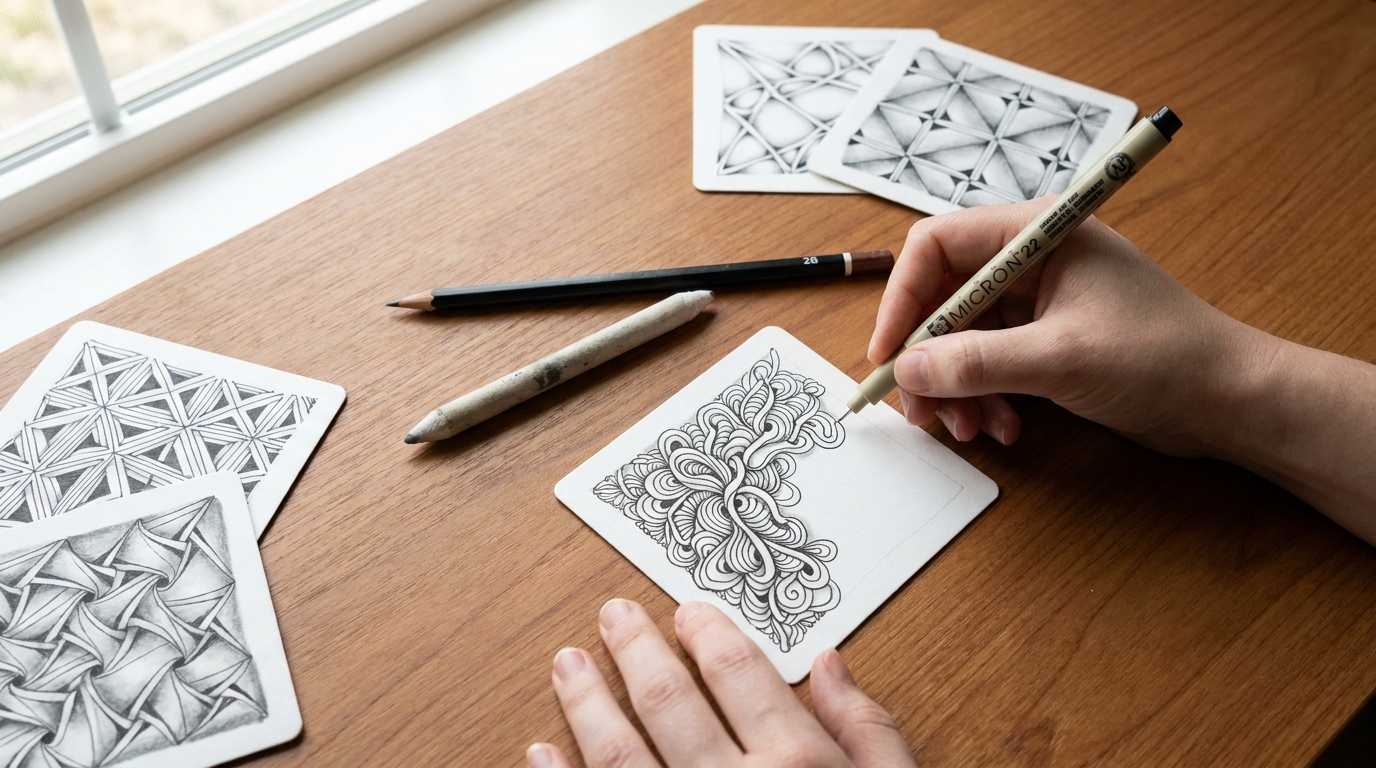
And the best part is you don't need artistic talent, expensive tools, or years of practice; a pen, a pencil, and a small piece of paper are enough to get started. Tangles are drawn on small square tiles, usually 3.5 inches, using a black pen and finished with light graphite shading.
In this guide, you'll discover beginner-friendly zentangle patterns, learn how they work, and find out how to combine them into striking pieces of art.
What Happens to Your Brain When You Draw Zentangle Patterns
A scientific study published in 2024 in the journal Brain and Behavior used EEG to measure brain activity during Zentangle practice, and participants showed measurable results in increases in theta, alpha, beta, and gamma brain wave activity, which are the same patterns associated with meditative states and focused attention.
They also reported lower stress and greater emotional calm after each session.
Another study published in Frontiers in Psychiatry found a significant reduction in psychiatric symptoms of participants with serious mental illness, in just eight weeks of the zentangle program, alongside improved mindful attention scores that persisted five weeks after the program ended.
But it does not mean zentangle is a complete therapy. What it does show is the calming effects reported by participants.
The Fundamental Strokes Used In Zentangle Patterns
You can build every zentangle from just five basic marks called elemental strokes.
- Dots - Single ink points used for texture and spacing.
- Lines - Straight or slightly varied in pattern are the backbone of most geometric patterns.
- Orbs - Circular shapes. In zentangle, "orbs" rather than "perfect circles" is the preferred term, which immediately takes the pressure off.
- C-curves - A gentle arc, one direction.
- S-curves - The same arc reversed mid-stroke.
If you can make those five marks, you can draw every pattern on this page. That's literally how simple it works.
How to Draw a Zentangle Tile: The Basic Process
You don't need a kit, a class, or much time. Here's the standard approach:
Step 1
Dot the corners. Place a light pencil dot at each of the four corners of your tile (or whatever paper you're using). This anchors the composition without committing you to a rigid border.
Step 2
Draw a border. Connect the dots with a loose, hand-drawn line. It doesn't need to be straight, Zentangle tiles embrace imperfect lines.
Step 3
Add a string. Draw a loose, meandering pencil line across the interior of your tile. This divides the space into sections. Each section will hold a different tangle.
Step 4
Fill with tangles. Choose a pattern and fill one section. Then another. Let different patterns meet at the string's edges.
Step 5
Add shading. Use a graphite pencil (a 2B works well) to shade the areas where patterns overlap or sit behind one another. Blend with a tortillon or the tip of your finger. Shading is what turns a flat sketch into something with weight.
Step 6
Sign and date it. This sounds small, but it's part of the practice, acknowledging that you made something.
Start Here: 10 Zentangle Patterns Anyone Can Draw
These patterns are chosen because each one teaches a foundational skill. Learn them in order, and you'll have the muscle memory to attempt almost anything else in the catalog.
1. Crescent Moon
Crescent Moon is the pattern most certified teachers introduce first, and for good reason. Draw a row of C-curve shapes. Then add a second row of C-curves around the outside of the first, tracing the contour exactly. This tracing technique is called an aura in zentangle, a line that halos the one before it.
2. Printemps
Start with a dot, then spiral outward from it in a loose coil, the way you'd draw a snail shell or a spring viewed from the side. Let adjacent coils touch or nearly touch. Vary the spacing, and the coils start to look like a field of ferns or clustered springs. This imperfection makes it look more organic.
3. Hollibaugh
Hollibaugh is the pattern that teaches visual depth before shading even enters the picture.
Three or four overlapping straight lines are drawn across the tile, then a second set crossing them at a different angle. The trick: at every intersection, one line passes behind the other. Deciding which goes in front and then carefully leaving a gap at the overlap point is the entire skill.
4. Tipple
Draw overlapping circles of varying sizes across a space. That's it. What makes Tipple satisfying is the organic clustering, don't space them evenly. Let them bump against each other, let some be tiny and others large. Shade the areas where circles overlap, and the whole thing gains instant dimension.
5. Flux
A flowing, tapered leaf shape that points in alternating directions off a central line, like a river reed bending in the current. The stroke itself is a confident pull, start with pressure, release as you finish.
6. Msst
A simple grid of squares, each divided diagonally, and one triangle of each square filled in solid. The beauty here is not in any single mark; it's in the repetition. By the time you've filled a tile, the alternating filled triangles create an optical-illusion shimmer effect. Msst is proof that the simplest geometry becomes interesting at scale.
7. W2 (or "Weave")
Create a grid first, then draw alternating stripes in each box as if threading a ribbon over and under. This is the foundational pattern for understanding how zentangle handles overlaps and negative space simultaneously.
8. Knightsbridge
A checkerboard grid with every other square filled solid. Then, within each empty square, draw smaller concentric squares or circles. Knightsbridge demonstrates how a single, familiar structure, the checkerboard, becomes something unexpected when the empty spaces are treated as canvases in their own right.
9. Diva Dance
Overlapping ovals or rounded rectangles layered like fish scales or roof tiles. Each shape sits slightly above the last, and shading the lower edge of each one creates the illusion of depth quickly.
10. Paradox
A square that contains a slightly smaller square rotated 45 degrees, which contains another, and so on, spiraling inward. Each rotation creates a triangular wedge between the squares, which you fill alternately with light and dark shades.
What Supplies Do You Actually Need?
To get started, all you need is a fine-tip black pen, a piece of smooth paper, and a pencil for shading. That's enough to create your first Zentangle.
Frequently Asked Questions (FAQs)
Q1: Is zentangle the same as doodling?
No, though they're related. Doodling is typically unconscious and unstructured. Zentangle is something in which each stroke is drawn with full attention, and patterns follow a defined deconstruction.
Q2: Do I need artistic ability to draw zentangle patterns?
No. Because every pattern breaks down into the same five elemental strokes, dots, lines, orbs, C-curves, and S-curves, prior drawing experience has little bearing on how quickly someone picks it up.
Q3: How long does a zentangle tile take to complete?
Most tiles take 20 to 45 minutes, depending on the patterns chosen and how much shading you add. The small format (3.5 inches square) is intentional; it keeps the practice accessible in a short window of time.
Q4: Can zentangle patterns be used on larger paper?
Yes. When zentangle patterns are applied to a larger format, the piece is called a ZIA, Zentangle-Inspired Art. Many artists use ZIA to fill sketchbooks, letter forms, or abstract compositions.
Q5: What is a Certified Zentangle Teacher (CZT)?
A CZT has completed official training through Zentangle Inc. They're qualified to teach the method as developed by Rick Roberts and Maria Thomas. Finding a CZT can be useful if you want the full methodology rather than just the patterns.

.jpg)